Kitchen Cabinet Liner

cabinet shelf lining

cabinet shelf lining

Hi! While I’ve been silent (no internet and moving) I have been busy. Moving 25+ years of stuff takes time. Luckily Kevin and I can take our time in doing so. Getting the kitchen started was on my list of first. After wiping down the cabinets and counter tops with hot soapy water I removed the old cabinet shelf liners.

This was an experience in itself. I’m a Wal-Mart girl, a one stop shop for me. Bought my supplies and home I went. It’s been years since I put cabinet liner down. Last time I bought the cheap vinyl flooring and cut to shelf size. Real easy for cleaning, however- the edges curled up over time. This time round I bought the EasyLiner brand shelf liner shown above.

After messing up several pieces, I finally figured out a much better way of measuring the size of the liner for the shelf. As simple as it sounds, I removed the shelf from the cabinet and laid it on the liner; drawing around the shelf.

cabinet lining

As shown below- the left image the shelf was placed to the edge of the liner rolled out with the bottom side of the liner facing upward. The middle image is where I drew my line marking the length of board on the liner. Placing newspaper under the cabinet liner kept any marker ink off the counter top. And the right image the shelf was removed from the roll of shelf liner. Notice how the lines on the shelf paper are not straight? Prior to using this method, I was using the lines as my guide. I wasted several pieces of liner until using this adapted method.

trio cabinet lining

The liner fits beautifully in the cabinets!

cabinet shelf lining 2

Not sure how long the liner will last. Have you used this type of cabinet shelf liner? How often have you had to change it out?

Until next time- take care!

Best Wishes,
debra

Journal 2015

journal

Hi, it’s amazing how quick this year has gone by. It’s fun to reminisce as I look through my journal 2015 book. This project was my New Year’s resolution project for 2015. One thing I enjoy about going to my parents home is going downstairs and looking through one of the many family photo albums. Since the digital camera revolution, I have not printed my pictures. Storing them on my computer or phone was and is my standard. I wanted to change that.

With this change, I knew my efforts would need to be simple- very simple. That’s why I chose the 8.5×11 size scrapbook. Printing could be done at home or I could email my file to Kinko’s (my local office printing supply store).

A copy of my 2015 journal is posted below. It can be viewed in full screen or just as it is. Click on the page corner to flip the page. I would enjoy hearing what you think of the journal- did it inspire you to start one for 2016?

The supplies needed for my journal printing project:

1. Post Bound Scrapbook Album and refill pages

Hobby Lobby is my favorite crafting store. I take advantage of the sales whenever possible. The scrapbooks I use are purchased when they are on sale for 40% or 50% off. The post bound style is my preference. The book looks full with 10 or 50 pages! A three ring binder could be used as well.

2. Archival Sheet Protectors from WalMart

3. Print
At home or use a printing service.
FedEx Kinko’s
Office Depot

A one-sided color copy is only 70 cents at my local FedEx Kinko’s. When I am ready to print, it’s as simple as emailing the file. I drive by this location on a daily basis which is very easy and convenient for print pick up. The key is to print as I go- send in my files each month; not waiting til the end of the year!

4. Software to create the pages.
Keep in mind I needed this to be as simple as it could be. For quick pages I use Microsoft Office Word. Another good alternative program is Microsoft Works.

The other program I use and have mentioned several other times throughout my blog is, Lumapix Fotofusion. The Enhanced version was designed for digital enthusiasts and scrapbookers.

5. Fonts
Ok- I know all computers come with fonts. However, different fonts can make your journal more fun and creative. Again I needed simple so I wanted a more personal touch- my own handwriting!
Get your own handwritten font!

Do you scrapbook journal? I would enjoy hearing how you preserve your memories.

Best Wishes,
debra

Journal 2015 Year in Review

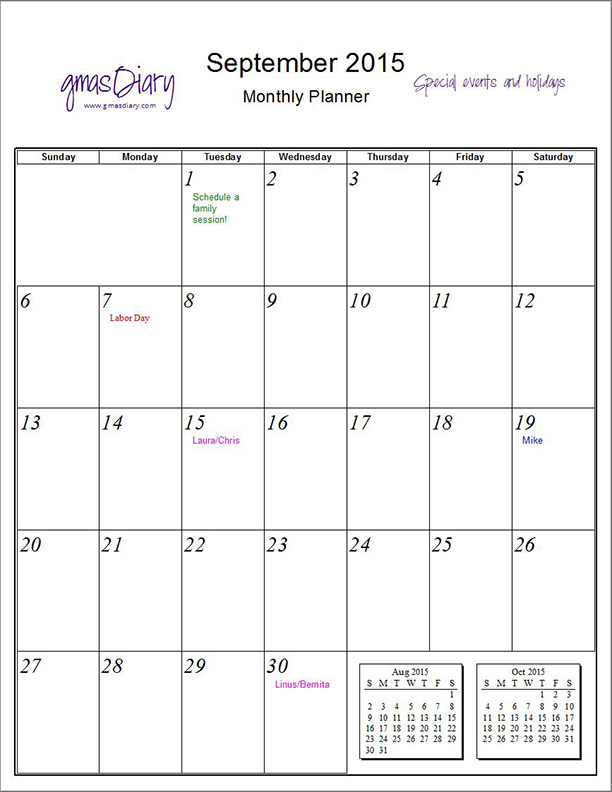
Calendar – Sept 2015 Just 16 Friday’s til Christmas!

calendar - september 2015
September 2015

It’s never too late to think about Christmas! Yes, you heard right. Summer is still in full swing. Vacations were great and now you’re working on saving your images to a photo album. The first day of autumn is September 23, 2015. Autumn is a beautiful time of year for family pictures. Check your calendar and if you haven’t done so already, book a photography session. Christmas cards featuring you and your family are cherished memories friends and family enjoy receiving!

Shoutout- Now that it’s September there are only 16 Friday’s until Christmas! The 16th being Christmas day.

There are several online printing labs that offer great ideas for the Christmas season. Here are just a few:

Wolfe’s Camera Shop

Snapfish

TinyPrints

Have fun thinking Christmas in September!

Best Wishes,
debra